
Sparrow Wifi - Graphical WiFi Analyzer for Linux
Sparrow-wifi has been built from the ground up to be the next generation 2.4 GHz and 5 GHz Wifi spectral awareness tool. At its most basic it provides a more comprehensive GUI-based replacement for tools like inSSIDer and linssid that runs specifically on linux. In its most comprehensive use cases, sparrow-wifi integrates wifi, software-defined radio (hackrf), advanced bluetooth tools (traditional and Ubertooth), traditional GPS (via gpsd), and drone/rover GPS via mavlink in one solution.
[NOTE: Check the Raspberry Pi section for updates. A setup script is now included to get the project running on Raspbian Stretch.]
Written entirely in Python3, Sparrow-wifi has been designed for the following scenarios:
- Basic wifi SSID identification
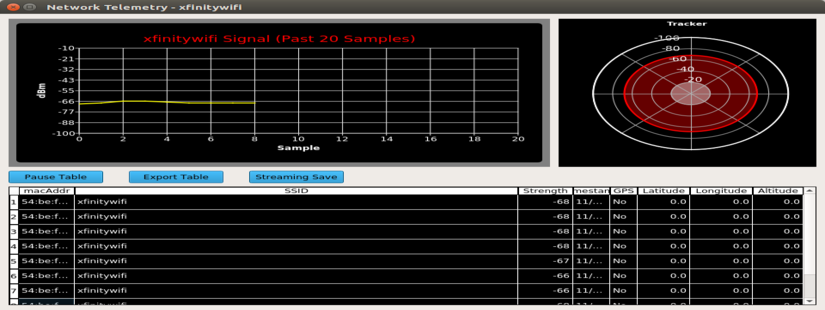
- Wifi source hunt - Switch from normal to hunt mode to get multiple samples per second and use the telemetry windows to track a wifi source
- 2.4 GHz and 5 GHz spectrum view - Overlay spectrums from Ubertooth (2.4 GHz) or HackRF (2.4 GHz and 5 GHz) in real time on top of the wifi spectrum (invaluable in poor connectivity troubleshooting when overlapping wifi doesn’t seem to be the cause)
- Bluetooth identification - LE advertisement listening with standard bluetooth, full promiscuous mode in LE and classic bluetooth with Ubertooth
- Bluetooth source hunt - Track LE advertisement sources or iBeacons with the telemetry window
- iBeacon advertisement - Advertise your own iBeacons
- Remote operations - An agent is included that provides all of the GUI functionality via a remote agent the GUI can talk to.
- Drone/Rover operations - The agent can be run on systems such as a Raspberry Pi and flown on a drone (its made several flights on a Solo 3DR), or attached to a rover in either GUI-controlled or autonomous scan/record modes.
- The remote agent is JSON-based so it can be integrated with other applications
- Import/Export - Ability to import and export to/from CSV and JSON for easy integration and revisiualization. You can also just run ‘iw dev
scan' and save it to a file and import that as well. - Produce Google maps when GPS coordinates are available for both discovered SSID’s / bluetooth devices or to plot the wifi telemetry over time.
A few sample screenshots. The first is the main window showing a basic wifi scan, the second shows the telemetry/tracking window used for both Wifi and bluetooth tracking.

Installation
sparrow-wifi uses python3, qt5, and qtchart for the UI. On a standard debian variant you will may already have python3 and qt5 installed. The only addition to run it is qtchart. The following commands should get you up and running with wifi on both Ubuntu and Kali linux:
sudo apt-get install python3-pip gpsd gpsd-clients python3-tk python3-setuptools
sudo pip3 install QScintilla PyQtChart gps3 dronekit manuf python-dateutil numpy matplotlib
Some folks have been running sparrow with a python virtualenv, if you’d like to run it in an isolated python environment, the following sequence should get you up and running:
git clone https://github.com/ghostop14/sparrow-wifi
cd sparrow-wifi
virtualenv --python=python3 $HOME/sparrow
source $HOME/sparrow/bin/activate
pip3 install gps3 python-dateutil requests pyqt5 pyqtchart numpy matplotlib
sudo python3 sparrow-wifi.py
NOTE: If you’re trying to run on a Raspberry Pi, see the Raspberry Pi section below. Only the remote agent has been run on a Pi, some of the GUI components wouldn’t install / set up on the ARM platform.
Running sparrow-wifi
Because it needs to use the standard command-line tool ‘iw’ for wifi scans, you will need to run sparrow-wifi as root. Simply run this from the cloned directory:
sudo ./sparrow-wifi.py
WiFi Notes
One item of note on wifi scanning, especially in the 5 GHz range is to find a card that works. It’s not so much an issue with the ‘iw’ tool, however in more advanced configurations where monitoring mode is required, it can be an issue.
Bluetooth
For folks familiar with WiFi but ‘new’ to Bluetooth scanning, bluetooth is different enough that some of what you may want to see based on wifi won’t be available (and may seem a bit frustrating at first). It all fundamentally comes down to how bluetooth operates. Bluetooth uses frequency hopping across the entire 2.4 GHz range, so it doesn’t present in nice clean single channel buckets like wifi does. To complicate things there is a low energy (BTLE) and Classic mode that are incompatible from an RF perspective, so generally a bluetooth adapter can only scan for one type or the other at any given time.
Bluetooth devices are also generally only discoverable when advertising (think broadcasting broadcasting). The only other way to find bluetooth devices is with a device that can sniff all bluetooth packets out of the air, which standard bluetooth adapters don’t do. Which is where hardware like an Ubertooth come in to get a better view of the bluetooth environment. And of course then if they’re not transmitting you wouldn’t have anything to go off of. And if you have to catch packets being transmitted you may need to scan/linger longer to see it, increasing scan frame rates to as long as 30 seconds to a minute.
So with all that said, with a standard / built-in bluetooth adapter, Sparrow-wifi can do advertisement scanning for bluetooth low energy (BTLE) devices. If they’re advertising their transmit power, it’ll attempt a range calculation. This what the latest iBeacon solutions and products do to be physically locatable. However with multi-pathing, internal walls, etc. don’t expect an extreme level of accuracy. As an added bonus, sparrow-wifi can also advertise its own iBeacons for tracking (this could be useful from a remote agent to turn on location discovery). However not all bluetooth cards will advertise transmit power so you may not always get range. If you do have an Ubertooth, sparrow-wifi can use it for promiscuous discovery of both BTLE and classic bluetooth devices. Of course there’s a tradeoff. Traditional LE scans update faster for tracking which is easier for bluetooth ‘hunt’, however promiscuous mode can identify more devices at the expense of needing to linger longer to listen.
If you would like to scan for bluetooth, you’ll need a few things:
- A bluetooth adapter (test with ‘hcitool dev’ to make sure it shows up). With an adapter you can do basic BTLE advertisement and iBeacon scans.
- [Optional ] An Ubertooth for promiscuous discovery scans (BTLE and Classic Bluetooth)
- Ubertooth tools installed and functioning (you can test it with ubertooth-specan-ui)
- Blue Hydra installed into /opt/bluetooth/blue_hydra (mkdir /opt/bluetooth && cd /opt/bluetooth && git clone https://github.com/pwnieexpress/blue_hydra.git). Then make sure you’ve followed the blue_hydra installation instructions. You can test it with bin/blue_hydra. This msut be in /opt/bluetooth/blue_hydra or the app won’t find it.
I strongly recommend running ‘hcitool lescan’ from the command-line first to make sure everything is working okay. If you have an Ubertooth, run ubertooth-specan-ui and run blue_hydra to make sure those tools work properly before attempting in sparrow-wifi.
Some troubleshooting tips:
- If you don’t see any devices with a basic LE advertisement scan, try “hcitool lescan” from the command-line and see if you get any errors. If so address them there. Sometimes a quick “hciconfig hci0 down && hciconfig hci0 up” can fix it.
- If you have an Ubertooth and don’t see any spectrum try running ubertooth-specan or ubertooth-specan-ui from the command line. If you get any errors address them there.
Spectrum
Near real-time spectral overlays in both spectrums is one feature that differentiates sparrow-wifi from other wifi tools. To get spectral overlays, two options are available. The less expensive approach is to use an Ubertooth One. Spectrum scanning is one of the features of the hardware with 1 MHz channel resolution. The downside is that Ubertooth is just focused on the 2.4 GHz spectrum (after all that’s where bluetooth functions), so you won’t be able to scan the 5 GHz range. If you have more experience and/or hardware focused on software-defined radio (SDR) and have a HackRF One available, while a little more expensive an option, you can scan both the 2.4 (with 0.5 MHz resolution) and 5 GHz (with 2 MHz resolution) spectrum ranges. The next 2 sections provide some details unique to each hardware device. In general the goal of sparrow-wifi were frame rates of about 10 fps local and 5 fps via the remote agent (depending on remote hardware and network connectivity).
The following screenshot shows a 2.4 GHz perspective with an Ubertooth spectrum (with 1 MHz bins) overlay. It’s quite interesting to watch the spectrum when bluetooth devices are also active. You can observe the bluetooth channel hopping in the spectrum. There are other protocols such as zigbee and other IoT protocols, even cordless phones that may also show up in the 2.4 GHz spectrum that would not otherwise show up on a wifi-only view. Having the spectral overlay provides an invaluable perspective on other interference in the spectrum for troubleshooting say for instance if no overlapping wireless channels seem to be the source of poor connectivity.

Ubertooth One
Once you get an Ubertooth One, the first thing you should do is download and build the latest tools and flash it with the latest firmware version. With that in place, try running ubertooth-specan-ui for a nice quick graphical spectrum display. If this is working, the Ubertooth should work fine in sparrow-wifi (just close any running Ubertooth tools before attempting to display the spectrum). Sparrow-wifi will automatically detect that the Ubertooth is present and the tools are available on startup and enable the appropriate menu choices. Note that if you start sparrow-wifi without the Ubertooth connected, just close sparrow-wifi and reopen it and it should see it. You can manually test it with lsusb to see that the Ubertooth is present.
HackRF One
HackRF support has been added to take advantage of the hackrf_sweep capabilities added to the HackRF firmware. With a HackRF you can sweep the entire range for a view of the spectrum. While hackrf_sweep can sweep from 2.4 GHz through 5 GHz, the frame rate is too slow (like 1 frame every 2 seconds), so you can use it for only one band at a time. With that said, if you have both an Ubertooth and a HackRF, you could use the Ubertooth to display the 2.4 GHz band and the HackRF to display the 5 GHz band simultaneously.
IMPORTANT: Standard RF and antenna rules apply. If you want to monitor either band, make sure you have an antenna capable of receiving in that band (the standard telescoping HackRF antenna probably won’t work as it’s only rated up to 1 GHz). And if you do want to grab an external dual-band antenna used on wireless cards, just note that the connector polarity is typically reversed (rp-sma rather than the sma connector on the HackRF) so you’ll need to grab an adapter to connect it to the HackRF (they’re only a couple dollars on Amazon). An RP-SMA antenna will screw on to the SMA connector but the center pin isn’t there so you won’t actually receive anything. Just a word of caution.
Notes: The 5 GHz spectrum, even with a dual-band antenna can be difficult to see signals in the same way as in 2.4 GHz. The SNR for 5 GHz seems much lower than 2.4 GHz. Some of this could be attributed to the HackRF as 5 GHz is getting towards the edge of its useable frequency range, while part of it can also be attributed to 5 GHz not penetrating walls, ceilings, etc. as well as 2.4 GHz. Sometimes the 5 GHz band shows better in a waterfall plot to distinguish an active signal, but if that’s what you need try the tool qspectrumanalyzer.
Troubleshooting tips:
- If you don’t see any spectrum at all try running hackrf_sweep from the command-line. If you get any errors, address them there.
GPS
Sparrow-wifi relies on gpsd to provide standard GPS communications. During testing there were a number of GPS-related issues worth being aware of. First in terms of GPS receivers, make sure you get one that works with gpsd. I’ve tested it with a GlobalSAT ND-105C Micro USB receiver. I’ve also used a GPS app on an android device to provide GPS over bluetooth (although this takes some tinkering, and would preclude using the bluetooth adapter for scanning while using it for GPS).
So the first important note is on the GPS receiver side. If you are planning on using the GPS receiver indoors, you may need to make sure the GPS you get specifically states it will work indoors. Anyone with a Garmin or other outdoor sports GPS system may be aware that they tend to not synchronize with satellites well while indoors. The stock GPS on the Solo 3DR drone is the same way as is the GlobalSAT receiver. When they’re close to windows, etc. they may finally sync up after some time, but reception indoors isn’t great and if you’re in an office building or other metal/concrete structure, the receiver may have a tough time receiving the satellite signals. So keep this in mind when picking a GPS receiver.
In terms of getting the receiver to work with gpsd, there were some challenges that were encountered getting it to work. First, the easiest way to test the gps is to stop the gpsd service (service gpsd stop), and run gpsd from the command-line with debugging enabled. If you have a USB-based GPS you should see a device that looks like /dev/ttyUSB0 show up when it is connected. If that’s the case, a command similar to this would start gpsd in the foreground for a quick test:
gpsd -D 2 -N /dev/ttyUSB0
If you see good data, you can daemonize it by just removing the -N parameter. On Ubuntu, editing /etc/default/gpsd and specifically putting /dev/ttyUSB0 in the device parameter and restarting the service worked fine. However on Kali linux and the Raspberry Pi, the same process didn’t work as if the gpsd service was ignoring the parameter. In those cases, the GPS service was set to not auto-start and the gpsd daemon was started manually from the command-line with the command ‘gpsd /dev/ttyUSB0’.
Once the daemon is up and working, xgps is a tool that’s part of the gpsd-clients package that provides a really nice GUI to check GPS and satellite status. If you run xgps it will tell you when the receiver is synchronized and give you a number of other parameters to make sure it is working correctly. If everything looks like it’s working with xgps, then sparrow-wifi should be able to pull the data as any other gpsd client would.
Running sparrow-wifi remote agent
Because the agent has the same requirements as the GUI in terms of system access, you will need to run the agent as root as well. Simply run:
sudo ./sparrowwifiagent.py
By default it will listen on port 8020. There are a number of options that can be seen with –help, and a local configuration file can also be used.
An alternate port can also be specified with:
sudo ./sparrowwifiagent.py --port=<myport>
There are a number of options including IP connection restrictions and record-local-on-start. Here’s the –help parameter list at this time:
usage: sparrowwifiagent.py [-h] [--port PORT] [--allowedips ALLOWEDIPS]
                           [--mavlinkgps MAVLINKGPS] [--sendannounce]
                           [--userpileds] [--recordinterface RECORDINTERFACE]
                           [--ignorecfg] [--cfgfile CFGFILE]
                           [--delaystart DELAYSTART]

Sparrow-wifi agent

optional arguments:
  -h, --help            show this help message and exit
  --port PORT           Port for HTTP server to listen on
  --allowedips ALLOWEDIPS
                        IP addresses allowed to connect to this agent. Default
                        is any. This can be a comma-separated list for
                        multiple IP addresses
  --mavlinkgps MAVLINKGPS
                        Use Mavlink (drone) for GPS. Options are: '3dr' for a
                        Solo, 'sitl' for local simulator, or full connection
                        string ('udp/tcp:<ip>:<port>' such as:
                        'udp:10.1.1.10:14550')
  --sendannounce        Send a UDP broadcast packet on the specified port to
                        announce presence
  --userpileds          Use RPi LEDs to signal state. Red=GPS
                        [off=None,blinking=Unsynchronized,solid=synchronized],
                        Green=Agent Running [On=Running, blinking=servicing
                        HTTP request]
  --recordinterface RECORDINTERFACE
                        Automatically start recording locally with the given
                        wireless interface (headless mode) in a recordings
                        directory
  --ignorecfg           Don't load any config files (useful for overriding
                        and/or testing)
  --cfgfile CFGFILE     Use the specified config file rather than the default
                        sparrowwifiagent.cfg file
  --delaystart DELAYSTART
                        Wait <delaystart> seconds before initializing
Drone / Rover Operations
Being able to “war fly” (the drone equivilent of “wardriving” popular in the wifi world) was another goal of the project. As a result, being able to have a lightweight agent that could be run on a small platform such as a Raspberry Pi that could be mounted on a drone was incorporated into the design requirements. The agent has been flown successfully on a Solo 3DR drone (keeping the overall weight under the 350 g payload weight). The Solo was a perfect choice for the project because the controller acts as a wifi access point and communicates with the drone over a traditional IP network using the mavlink protocol. This allows other devices such as laptops, tablets, and the Raspberry Pi to simply join the controller wifi network and have IP connectivity. This was important for field operations as it kept the operational complexity down. Because these drones have onboard GPS as part of their basic functionality, it’s possible over mavlink (with the help of dronekit) to pull GPS coordinates directly from the drone’s GPS. This helps keep the overall payload weight down as an additional GPS receiver does not need to be flown as part of the payload. Also, in order to keep the number of tasks required by the drone operator to a minimum during flight, the agent can be started, wait for the drone GPS to be synchronized, use the Raspberry Pi lights to signal operational readiness, and automatically start recording wifi networks to a local file. The GUI then provides an interface to retrieve those remotely saved files and pull back for visualization. This scenario has been tested with a Cisco AE1000 dual-band adapter connected to the Pi. Note though that I ran into an issue scanning 5 GHz from the Pi that I finally found the solution for. With a dual-band adapter, if you don’t disable the internal Pi wireless adapter you won’t get any 5 GHz results (this is a known issue). What you’ll need to do is disable the onboard wifi by editing /boot/config.txt and adding the following line then reboot ‘dtoverlay=pi3-disable-wifi’. Now you’ll be able to scan both bands from the Pi. The quickest way to start the agent on a Raspberry Pi (IMPORTANT: see the Raspbery Pi section first, if you’re running Raspian Squeeze, you’ll need to build Python 3.5 first (Stretch already has 3.5) to run the agent since the subprocess commands used were initially removed from python3 then put back in 3.5) and pull GPS from a Solo drone is to start it with the following command on the Pi:
sudo python3.5 ./sparrowwifiagent.py --userpileds --sendannounce --mavlinkgps 3dr
The Raspberry Pi red and green LED’s will then be used as visual indicators transitioning through the following states:
- Both lights off - Initializing
- Red LED Heartbeat - Connected to the drone (dronekit vehicle connect was successful)
- Red LED Solid - Connected and GPS synchronized and operational (the drone can take a couple of minutes for the GPS to settle as part of its basic flight initialization)
- Green LED Solid - Agent HTTP server is up and the agent is operational and ready to serve requests
Note: Without the mavlink setting, if using a local GPS module, the red LED will transition through the same heartbeat=GPS present but unsynchronized, solid = GPS synchronized states.
If you don’t have a second set of hands while flying your drone and want to fly the Pi without having to worry about the agent, you can start the agent in auto-record mode. There are a few scripts in the scripts directory that start with ‘rpi’ that can be scheduled for monitoring the agent and starting it as appropriate. The overall intention is a headless configuration where the Pi starts up (you’ll need to configure the wifi on the Pi ahead of time to automatically connect to the controller wifi network), the agent will be started and automatically go into wifi record mode using the drone’s gps for recording. Once you’re done the sparrow-wifi agent menu gives you a screen to manage the files in the recordings directory on the agent and download or delete the files there. These scripts in the scripts directory are just samples. It is highly recommended that you customize them and the Pi integration to meet your specific needs, and by all means keep safety (and federal regulations) in mind when doing anything with a drone as you’re responsible for both.
Raspberry Pi Notes
Raspbian Stretch
Raspbian Stretch now includes the correct version of Python, so no more custom python builds. The only thing that has to be custom handled is that PyQTChart is not in the apt repository or available via pip to build on raspbian. However, thanks to folks over at this thread: https://github.com/mu-editor/mu/issues/441, I’ve been able to reproduce their pyqtchart build process on Raspbian Stretch. So to make everyone’s life easier, there’s now a script included with the project called rpi.setup_prerequisites.sh. Sudo that script first, then Sparrow “should” work for you. I tested it on a Pi 3B board with the 7” touchscreen and it works great.
Raspbian Jesse
You can run the remote agent on a Raspberry pi, however the installation requirements are a bit different. First, Python3 did not include some of the subprocess module capabilities in the initial 3.x versions prior to 3.5. However they did put them back in from 3.5 forward. In terms of Raspian builds, Raspbian Squeeze only has Python 3.4.x in the repository. So the first step will be to download and build Python 3.5. However if you’re running on Debian Stretch (the latest as of now), you can skip the 3.5 build. The repositories do have Python 3.5.
You can use the following sequence to build python if you need to (you will need to apt-get install libsqlite3-dev prior to building Python since it’s built in at compile time now):
sudo apt-get install libsqlite3-dev

cd /tmp
wget https://www.python.org/ftp/python/3.5.5/Python-3.5.5.tgz
tar -zxvf Python-3.5.5.tgz
cd Python-3.5.5
./configure && make -j3 && sudo make install
Once that is done, install the necessary modules into the 3.5 build: sudo pip3.5 install gps3 dronekit manuf python-dateutil
Then you can run the agent directly with commands like this:
/usr/local/bin/python3.5 ./sparrowwifiagent.py

/usr/local/bin/python3.5 ./sparrowwifiagent.py --mavlinkgps=3dr --recordinterface=wlan0
Note that if you forget to specifically start them with 3.5 you will get an exception thrown since a subprocess function will be missing.
Another important note about using dual band USB wireless adapters on the Raspberry Pi (tested on a Pi 3), is that as long as the internal wireless is enabled, Raspbian won’t see the 5 GHz band.
Add this line in your /boot/config.txt to disable the internal wireless, then your dual-band USB wireless will be able to see the 5 GHz band:
dtoverlay=pi3-disable-wifi
The red and green LED’s are also used on the Raspberry Pi to provide some visual feedback:
- Both lights off - Initializing
- Red LED Heartbeat - gpsd found but unsynchronized (red light will stay off if gpsd is not installed or not running)
- Red LED Solid - gpsd receiver synchronized
- Green LED Solid - Agent HTTP server is up and the agent is operational and ready to serve requests