

A dashboard showing live data and statistics from the ZMQ feeds of one or more MISP instances. The dashboard can be used as a real-time situational awareness tool to gather threat intelligence information. The misp-dashboard includes a gamification tool to show the contributions of each organisation and how they are ranked over time. The dashboard can be used for SOCs (Security Operation Centers), security teams or during cyber exercises to keep track of what is being processed on your various MISP instances.
Features
Live Dashboard
- Possibility to subscribe to multiple ZMQ feeds from different MISP instances
- Shows immediate contributions made by organisations
- Displays live resolvable posted geo-locations

Geolocalisation Dashboard
- Provides historical geolocalised information to support security teams, CSIRTs or SOCs in finding threats within their constituency
- Possibility to get geospatial information from specific regions

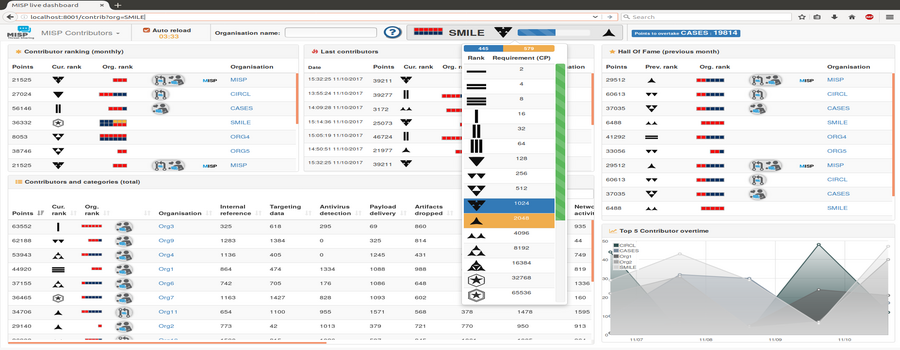
Contributors Dashboard
Shows:
- The monthly rank of all organisations
- The last organisation that contributed (dynamic updates)
- The contribution level of all organisations
- Each category of contributions per organisation
- The current ranking of the selected organisation (dynamic updates)
Includes:
- Gamification of the platform:
- Two different levels of ranking with unique icons
- Exclusive obtainable badges for source code contributors and donator


Users Dashboard
- Shows when and how the platform is used:
- Login punchcard and contributions over time
- Contribution vs login

Trendings Dashboard
- Provides real time information to support security teams, CSIRTs or SOC showing current threats and activity
- Shows most active events, categories and tags
- Shows sightings and discussion overtime

Installation
Before installing, consider that the only supported system are open source Unix-like operating system such as Linux and others.
- Launch
./install_dependencies.shfrom the MISP-Dashboard directory (idempotent-ish) - Update the configuration file
config.cfgso that it matches your system- Fields that you may change:
- RedisGlobal -> host
- RedisGlobal -> port
- RedisGlobal -> zmq_url
- RedisGlobal -> misp_web_url
- RedisMap -> pathMaxMindDB
- Fields that you may change:
Updating by pulling
- Re-launch
./install_dependencies.shto fetch new required dependencies - Re-update your configuration file
config.cfgby comparing eventual changes inconfig.cfg.default
:warning: Make sure no zmq python3 scripts are running. They block the update.
+ virtualenv -p python3 DASHENV
Already using interpreter /usr/bin/python3
Using base prefix '/usr'
New python executable in /home/steve/code/misp-dashboard/DASHENV/bin/python3
Traceback (most recent call last):
  File "/usr/bin/virtualenv", line 9, in <module>
    load_entry_point('virtualenv==15.0.1', 'console_scripts', 'virtualenv')()
  File "/usr/lib/python3/dist-packages/virtualenv.py", line 719, in main
    symlink=options.symlink)
  File "/usr/lib/python3/dist-packages/virtualenv.py", line 942, in create_environment
    site_packages=site_packages, clear=clear, symlink=symlink))
  File "/usr/lib/python3/dist-packages/virtualenv.py", line 1261, in install_python
    shutil.copyfile(executable, py_executable)
  File "/usr/lib/python3.5/shutil.py", line 115, in copyfile
    with open(dst, 'wb') as fdst:
OSError: [Errno 26] Text file busy: '/home/steve/code/misp-dashboard/DASHENV/bin/python3'
- Restart the System:
./start_all.shOR./start_zmq.shand./server.py &
Starting the System
:warning: You should not run it as root. Normal privileges are fine.
- Be sure to have a running redis server
- e.g.
redis-server --port 6250
- e.g.
- Activate your virtualenv
. ./DASHENV/bin/activate - Listen to the MISP feed by starting the zmq_subscriber
./zmq_subscriber.py & - Start the dispatcher to process received messages
./zmq_dispatcher.py & - Start the Flask server
./server.py & - Access the interface at
http://localhost:8001/
Alternatively, you can run the start_all.sh script to run the commands described above.
Authentication
Authentication can be enable in config/config.cfg by setting auth_enabled = True. Users will be required to login to MISP and will be allowed to proceed if they have the User Setting’s dashboard_access sets to 1 for the MISP user account.
Debug
Debug is fun and gives you more details on what is going on when things fail. Bare in mind running Flask in debug is NOT suitable for production, it will drop you to a Python shell if enabled, to do further digging.
Just before running ./server.py do:
export FLASK_DEBUG=1
export FLASK_APP=server.py
flask run --host=0.0.0.0 --port=8001 # <- Be careful here, this exposes it on ALL ip addresses. Ideally if run locally --host=127.0.0.1
OR, just toggle the debug flag in start_all.sh or config.cfg.
Happy hacking ;)
Restart from scratch
To restart from scratch and empty all data from your dashboard you can use the dedicated cleaning script clean.py
usage: clean.py [-h] [-b]

Clean data stored in the redis server specified in the configuration file

optional arguments:
  -h, --help    show this help message and exit
  -b, --brutal  Perfom a FLUSHALL on the redis database. If not set, will use
                a soft method to delete only keys used by MISP-Dashboard.
Notes about ZMQ
The misp-dashboard being stateless in regards to MISP, it can only process data that it received. Meaning that if your MISP is not publishing all notifications to its ZMQ, the misp-dashboard will not have them.
The most revelant example could be the user login punchcard. If your MISP doesn’t have the option Plugin.ZeroMQ_audit_notifications_enable set to true, the punchcard will be empty.
Dashboard not showing results - No module named zmq
When the misp-dashboard does not show results then first check if the zmq module within MISP is properly installed.
In Administration, Plugin Settings, ZeroMQ check that Plugin.ZeroMQ_enable is set to True.
Publish a test event from MISP to ZMQ via Event Actions, Publish event to ZMQ.
Verify the logfiles
${PATH_TO_MISP}/app/tmp/log/mispzmq.error.log
${PATH_TO_MISP}/app/tmp/log/mispzmq.log
If there’s an error ModuleNotFoundError: No module named ‘zmq’ then install pyzmq.
$SUDO_WWW ${PATH_TO_MISP}/venv/bin/pip install pyzmq
zmq_subscriber options
usage: zmq_subscriber.py [-h] [-n ZMQNAME] [-u ZMQURL]

A zmq subscriber. It subscribe to a ZMQ then redispatch it to the MISP-dashboard

optional arguments:
  -h, --help            show this help message and exit
  -n ZMQNAME, --name ZMQNAME
                        The ZMQ feed name
  -u ZMQURL, --url ZMQURL
                        The URL to connect to
Deploy in production using mod_wsgi
Install Apache mod-wsgi for Python3
sudo apt-get install libapache2-mod-wsgi-py3
Caveat: If you already have mod-wsgi installed for Python2, it will be replaced!
The following packages will be REMOVED:
  libapache2-mod-wsgi
The following NEW packages will be installed:
  libapache2-mod-wsgi-py3
Configuration file /etc/apache2/sites-available/misp-dashboard.conf assumes that misp-dashboard is cloned into /var/www/misp-dashboard. It runs as user misp in this example. Change the permissions to your custom folder and files accordingly.
<VirtualHost *:8001>
    ServerAdmin admin@misp.local
    ServerName misp.local

    DocumentRoot /var/www/misp-dashboard

    WSGIDaemonProcess misp-dashboard \
       user=misp group=misp \
       python-home=/var/www/misp-dashboard/DASHENV \
       processes=1 \
       threads=15 \
       maximum-requests=5000 \
       listen-backlog=100 \
       queue-timeout=45 \
       socket-timeout=60 \
       connect-timeout=15 \
       request-timeout=60 \
       inactivity-timeout=0 \
       deadlock-timeout=60 \
       graceful-timeout=15 \
       eviction-timeout=0 \
       shutdown-timeout=5 \
       send-buffer-size=0 \
       receive-buffer-size=0 \
       header-buffer-size=0 \
       response-buffer-size=0 \
       server-metrics=Off

    WSGIScriptAlias / /var/www/misp-dashboard/misp-dashboard.wsgi

    <Directory /var/www/misp-dashboard>
        WSGIProcessGroup misp-dashboard
        WSGIApplicationGroup %{GLOBAL}
        Require all granted
    </Directory>

    LogLevel info
    ErrorLog /var/log/apache2/misp-dashboard.local_error.log
    CustomLog /var/log/apache2/misp-dashboard.local_access.log combined
    ServerSignature Off
</VirtualHost>